To access WordPress admin with a fatal error warning, disable plugins via FTP or cPanel. Then, reactivate the plugins one by one.
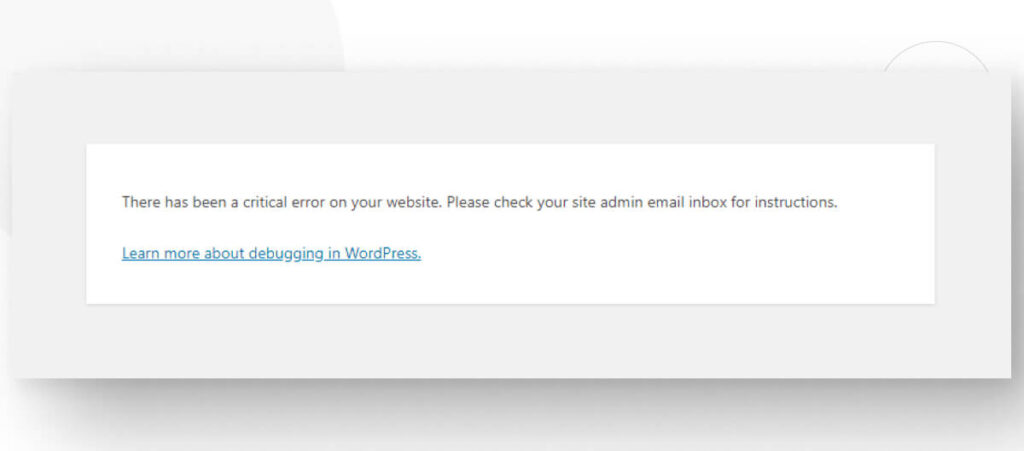
Encountering a fatal error warning in WordPress can be alarming. This error often arises from a conflict or a faulty plugin. It locks you out of your admin dashboard, making troubleshooting difficult. Fortunately, you can resolve this issue by accessing your website files directly through FTP or your hosting provider’s cPanel.
Disabling the problematic plugin usually restores access to your dashboard. Understanding the cause and solution helps maintain a smooth-running WordPress site. Follow these steps to regain control and ensure your website’s functionality and security.
Identifying The Fatal Error
Experiencing a fatal error in WordPress can be alarming. This error often locks you out of your admin panel. Understanding the issue is crucial to resolving it. The first step is to identify the fatal error.
Error Message Analysis
WordPress displays error messages to help diagnose problems. These messages contain valuable information. Pay attention to the specific error codes. Look for details about the file and line number causing the issue. Here is a breakdown of a common error message:
| Error Message | Explanation |
|---|---|
Fatal error: Uncaught Error | A critical error that has not been caught |
in /path/to/file.php | The file where the error occurred |
on line 123 | The specific line number in the file |
Common Error Scenarios
Understanding common error scenarios can help in diagnosing the problem. Here are some frequent causes of fatal errors in WordPress:
- Plugin Conflicts: Incompatible or outdated plugins can cause errors.
- Theme Issues: A corrupted or incompatible theme may lead to problems.
- Memory Limit Exhaustion: Exceeding the allocated memory limit can trigger errors.
- PHP Version Incompatibility: Running an outdated PHP version can cause conflicts.
Identifying the specific scenario helps in applying the correct fix. Always start by analyzing the error message. Then, consider the common causes listed above.

Credit: wcanvas.com
Backup Your Website
Encountering a fatal error on your WordPress site can be stressful. Before you attempt any fixes, it’s crucial to backup your website. This ensures you can restore your site if something goes wrong during the repair process.
Importance Of Backups
Backing up your website is like having an insurance policy. It protects your data and content. If your website crashes, you won’t lose everything. Regular backups help you recover quickly from errors, hacks, or server issues. Without backups, you risk losing months or years of work.
Tools For Backup
Several tools can help you back up your WordPress site. Here’s a list of popular options:
- UpdraftPlus: A comprehensive plugin offering manual and automatic backups.
- BackupBuddy: Known for its ease of use and full-site backups.
- VaultPress: Provides real-time backups and security scans.
- BackWPup: Allows you to save your backups to various cloud services.
Below is a table comparing these tools:
| Tool | Manual Backups | Automatic Backups | Cloud Storage |
|---|---|---|---|
| UpdraftPlus | Yes | Yes | Yes |
| BackupBuddy | Yes | Yes | Yes |
| VaultPress | Yes | Yes | Yes |
| BackWPup | Yes | Yes | Yes |
To backup your site, follow these simple steps:
- Install your chosen backup plugin.
- Configure the plugin settings.
- Run a manual backup to ensure everything works.
- Set up automatic backups for regular intervals.
By following these steps, you ensure your website is safe. Even if you encounter a fatal error, your data will remain intact.
Accessing File Manager
Encountering a fatal error on WordPress can be stressful. Fixing it often requires accessing the File Manager. This helps in editing or deleting problematic files. Below, you’ll find two methods to do this: using cPanel and FTP.
Using Cpanel
Accessing the File Manager via cPanel is straightforward. Follow these simple steps:
- Log in to your cPanel account.
- Navigate to the Files section.
- Click on File Manager.
- Locate your WordPress directory (usually public_html).
- Identify and open the wp-content folder.
- Make the necessary changes, such as disabling plugins or themes.
This method is user-friendly and doesn’t need additional software.
Using Ftp
FTP is another reliable way to access the File Manager. Here’s how to use it:
- Download and install an FTP client like FileZilla.
- Open the FTP client and enter your FTP credentials (host, username, password).
- Connect to your server.
- Navigate to the WordPress root directory (usually public_html).
- Open the wp-content folder.
- Locate and edit or delete the problematic files.
This method is useful if you can’t access cPanel.

Disabling Plugins
Encountering a fatal error warning in WordPress can be daunting. Often, plugins are the culprits behind such issues. Disabling plugins can help you regain access to your WordPress admin. Here’s how you can disable plugins effectively.
Renaming Plugin Folder
Renaming the plugin folder is a quick way to disable all plugins at once. Follow these steps:
- Access your website’s files using an FTP client or File Manager in your hosting cPanel.
- Navigate to the
wp-contentdirectory. - Locate the
pluginsfolder. - Right-click on the folder and select “Rename”.
- Change the folder name to
plugins_disabled.
By renaming the folder, WordPress will automatically deactivate all plugins. Try logging into your WordPress admin dashboard again.
Selective Plugin Deactivation
Disabling all plugins might not always be necessary. You can selectively deactivate plugins to find the problematic one.
- Access your website’s files using an FTP client or File Manager in your hosting cPanel.
- Navigate to the
wp-content/pluginsdirectory. - Open the
pluginsfolder. - Rename each plugin folder one by one. For example, rename
plugin-nametoplugin-name_disabled. - Try logging into your WordPress admin dashboard after renaming each plugin.
This method helps identify which plugin is causing the fatal error. Once identified, you can either update or delete the problematic plugin.
Switching To Default Theme
Facing a fatal error warning in WordPress can be frustrating. One quick solution is to switch to a default theme. This often resolves many issues caused by theme conflicts.
Theme Renaming
To switch to a default theme, first, rename your current theme. Renaming forces WordPress to revert to a default theme.
Follow these steps:
- Access your website files via FTP or your hosting control panel.
- Navigate to
wp-content/themesdirectory. - Find your current theme’s folder.
- Rename the theme folder by adding
-oldat the end.
WordPress will now try to use a default theme.
Activating Default Theme
After renaming your theme, WordPress will activate a default theme. These themes are usually Twenty Twenty-One or Twenty Twenty.
If WordPress does not activate a default theme:
- Log in to your WordPress admin dashboard.
- Go to
Appearance > Themes. - Activate a default theme manually.
Switching to a default theme helps identify if the issue was theme-related. If the error goes away, the problem likely lies within your original theme.
Debugging Mode
Encountering a fatal error on your WordPress site can be frustrating. One effective method to troubleshoot this issue is by using the Debugging Mode. This feature allows you to identify and fix errors by displaying detailed error messages and logs.
Enabling Debugging
To enable debugging, you need to edit the wp-config.php file. This file is located in the root directory of your WordPress installation.
- Open the
wp-config.phpfile using an FTP client or file manager. - Find the line that says
/ That's all, stop editing! Happy blogging. / - Above this line, add the following code:
define('WP_DEBUG', true);- Save the file and upload it back to your server.
With debugging enabled, WordPress will display error messages on your site.
Interpreting Debug Logs
WordPress can also log errors to a file for easier review. To enable this, add the following lines to your wp-config.php file:
define('WP_DEBUG_LOG', true);
define('WP_DEBUG_DISPLAY', false);
@ini_set('display_errors', 0);
These lines will save error messages to a debug log file.
You can find the debug log file in the wp-content directory. The file is named debug.log.
Open the debug.log file using an FTP client or file manager to see the logged errors. Look for error messages that indicate the source of the fatal error.
Common sources of errors include:
- Theme issues
- Plugin conflicts
- Server configuration problems
Identifying the specific error message can help you take corrective action.
By enabling and interpreting debug logs, you can quickly resolve fatal errors on your WordPress site.
Restoring Functionality
Facing a fatal error warning in WordPress can be daunting. This guide will help you restore functionality to your website.
Gradual Reactivation
First, disable all plugins. You can do this via FTP or cPanel. Rename the plugins folder to plugins_disabled.
Next, log into your WordPress dashboard. If you can access it, the issue lies with a plugin. Rename the folder back to plugins.
Re-enable each plugin one by one. Check your site after activating each plugin. This process helps identify the faulty plugin.
Monitoring For Errors
After reactivating plugins, keep an eye out for errors. Use the WP_DEBUG mode to log errors.
To enable WP_DEBUG, add the following line to your wp-config.php file:
define( 'WP_DEBUG', true );This will log errors to a file named debug.log in the wp-content directory.
Check the debug.log file for error messages. This will help you pinpoint the issue.
Steps Summary
| Step | Description |
|---|---|
| Disable Plugins | Rename the plugins folder. |
| Log In | Access your WordPress dashboard. |
| Re-enable Plugins | Activate each plugin one by one. |
| Monitor Errors | Check the debug.log file. |
Following these steps will help you restore your website’s functionality. Always monitor for errors to keep your site running smoothly.

Credit: wcanvas.com
Seeking Professional Help
Experiencing a fatal error warning in WordPress can be frustrating. Sometimes, fixing it yourself might not be an option. That’s where seeking professional help comes in handy. In this section, we will discuss when to call an expert and how to choose a reliable professional.
When To Call An Expert
Not every issue requires a professional. Here’s when you should call one:
- If the error persists after basic troubleshooting.
- When the website is down and losing traffic.
- If you lack technical skills to fix the issue.
- When the error affects your site’s functionality.
Choosing A Reliable Professional
Picking the right expert is crucial. Here are steps to help:
- Check Reviews: Look for customer reviews and ratings.
- Verify Credentials: Ensure they have relevant experience.
- Compare Prices: Get quotes from multiple professionals.
- Ask for Portfolio: Request previous work samples.
- Communication Skills: Good communication is essential.
A professional can help fix your WordPress site swiftly. Choose wisely to ensure the best results.
Frequently Asked Questions
What Causes A Fatal Error In WordPress?
A fatal error in WordPress can be caused by plugin conflicts, theme issues, or corrupted files. It stops the site from functioning.
How To Fix WordPress Fatal Error?
To fix a WordPress fatal error, disable all plugins via FTP. Then, switch to a default theme and check for corrupted files.
Can I Access WordPress Admin During A Fatal Error?
Yes, you can access WordPress admin during a fatal error by disabling plugins and themes via FTP. This often resolves the issue.
How Do I Disable Plugins Via Ftp?
To disable plugins via FTP, connect to your site, navigate to the wp-content/plugins directory, and rename the plugin folders.
Conclusion
Resolving a fatal error to access your WordPress admin can be challenging but manageable. Follow the steps carefully to troubleshoot. Regular backups and updates can prevent future issues. Keep your site secure and maintain plugins. With these tips, you can confidently handle WordPress errors.
Happy blogging!


