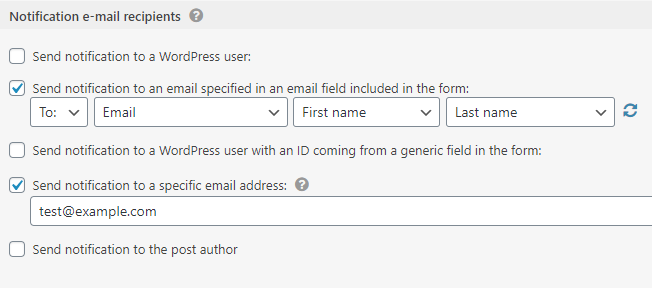
To get notifications of form submissions in WordPress, use a plugin like WPForms or Contact Form 7. Enable email notifications in the plugin settings.
Form submission notifications are crucial for managing user interactions on your WordPress site. These notifications keep you updated and ensure prompt responses to user inquiries or feedback. Plugins like WPForms and Contact Form 7 simplify this process. They offer easy configuration and customization of email alerts.
By integrating one of these plugins, you can stay informed about new submissions instantly. Enabling email notifications requires a few simple steps in the plugin settings. This feature enhances your site’s responsiveness and user engagement, making it an essential tool for any WordPress site owner.

Credit: toolset.com
Choosing The Right Plugin
Getting notifications when someone submits a form on your WordPress site is crucial. The right plugin can make this task easy and efficient. Let’s explore some popular plugins and what to consider.
Popular Plugins Overview
There are many plugins available for form notifications. Here are some of the popular ones:
- Contact Form 7: A simple and flexible plugin.
- WPForms: User-friendly and powerful.
- Ninja Forms: Great for beginners.
- Gravity Forms: Packed with features.
- Formidable Forms: Advanced and customizable.
Factors To Consider
Choosing the best plugin depends on several factors. Here are some key points to think about:
| Factor | Importance |
|---|---|
| Ease of Use | How easy is it to set up and use? |
| Features | Does it offer the features you need? |
| Compatibility | Will it work with your current setup? |
| Support | Is there good customer support available? |
| Cost | Is it within your budget? |
Let’s break these factors down:
- Ease of Use: Choose a plugin that is easy to install and configure.
- Features: Check if the plugin offers email notifications, SMS alerts, and more.
- Compatibility: Ensure the plugin works with your WordPress theme and other plugins.
- Support: Look for plugins with active support forums and documentation.
- Cost: Some plugins are free, while others have premium versions. Choose what fits your budget.
By considering these factors, you can select the right plugin for your WordPress site. If the contact form not working then you can read this “Contact Form in WordPress Not Working” article.
Installing The Plugin
Getting notifications from form submissions is crucial for WordPress users. Installing the right plugin ensures you never miss an important submission. Follow these steps to install a plugin for form notifications on WordPress.
Step-by-step Installation
- Login to your WordPress admin dashboard.
- Navigate to the Plugins section.
- Click on Add New at the top.
- In the search bar, type “Form Notification Plugin”.
- Find a plugin that suits your needs and click Install Now.
- After installation, click on Activate to enable the plugin.
Once activated, you can configure the plugin settings to receive notifications. Make sure to test the settings to confirm that you receive notifications.
Common Installation Issues
Sometimes, users face issues during plugin installation. Here are some common problems and solutions:
| Issue | Solution |
|---|---|
| Plugin installation fails | Check your internet connection and try again. |
| Plugin not showing after installation | Clear your browser cache and refresh the page. |
| Activation error | Ensure your WordPress version is compatible with the plugin. |
If you face further issues, contact the plugin’s support team. They can provide specific solutions for your problem.
Configuring Plugin Settings
To get notifications when someone submits a form on WordPress, you need to configure plugin settings. This process ensures you receive timely alerts for every form submission. Let’s dive into the different settings you need to configure.
General Settings
First, access the plugin’s dashboard. Navigate to the General Settings tab.
- Enable form notifications.
- Select the notification method: email or SMS.
- Set the default email address for notifications.
Make sure to save your changes.
Notification Settings
Next, head over to the Notification Settings tab. This section allows detailed configuration.
- Choose the form you want to configure.
- Set the notification subject and message.
- Include form data in the notification message.
- Test the notification settings before finalizing.
Double-check everything and save your settings.
Advanced Settings
Consider configuring advanced options for more control.
- Enable conditional notifications based on form inputs.
- Set different recipients for different forms.
- Use shortcodes to personalize notifications.
These settings help you manage notifications more effectively.

Credit: bitapps.pro
Setting Up Email Notifications
Setting up email notifications in WordPress is essential. It helps you stay updated. You get alerts when someone submits a form. This process ensures you never miss important submissions.
Email Template Customization
Customizing your email template improves clarity. It ensures you get all the needed information. Follow these steps:
- Go to your WordPress dashboard.
- Navigate to the form plugin settings.
- Find the email notifications section.
- Select Edit Email Template.
- Customize the subject line and message body.
- Use placeholders for form fields.
- Save your changes.
Custom templates look professional. They also ensure you get the exact data you need.
Recipient Management
Managing recipients ensures the right people get notified. You can add multiple recipients. Follow these steps:
- Go to the email notifications settings.
- Select Add Recipient.
- Enter the email address of the recipient.
- Specify the conditions for sending emails.
- Save your changes.
Adding multiple recipients is useful. It ensures all stakeholders are informed. You can also set conditions to control who gets notified.
| Feature | Description |
|---|---|
| Email Template | Customize the subject and body. |
| Recipients | Add multiple email addresses. |
| Conditions | Set specific criteria for notifications. |
Following these steps ensures efficient notification management. Keep your email notifications clear and concise. This improves response times and keeps your workflow smooth.
Testing Notifications
Ensuring you receive form submissions correctly is crucial. Testing notifications helps verify everything works. This section will guide you through creating test submissions and troubleshooting.
Creating Test Submissions
Start by creating a few test submissions. This process ensures your forms and notifications are set up correctly. Follow these steps:
- Go to your form on the website.
- Fill in the form with test data.
- Submit the form.
Check your email for the notification. Ensure all data appears as expected.
Troubleshooting
If you do not receive a notification, follow these troubleshooting steps:
- Check Spam Folder: Sometimes notifications go to spam.
- Email Settings: Ensure your email settings allow notifications.
- Form Settings: Verify notification settings in the form plugin.
- Plugin Updates: Ensure your form plugin is up to date.
If issues persist, consider checking the plugin’s support documentation. It may have specific troubleshooting tips.
Here is a simple example of how your email notification settings might look:
| Field | Value |
|---|---|
| To | Your email address |
| From | Website form |
| Subject | New Form Submission |
Review this table to ensure all settings are correct.
By following these steps, you can ensure that you receive notifications for every form submission.
Advanced Notification Options
Do you want to know instantly when someone submits a form on WordPress? Explore advanced notification options for immediate alerts. These options ensure you never miss a submission.
Sms Notifications
Receive form submission alerts directly on your phone. SMS notifications provide a quick way to stay updated.
- Install an SMS Plugin: Choose an SMS plugin for WordPress.
- Configure Settings: Set up your phone number and preferences.
- Test Notifications: Ensure you receive test messages properly.
These steps help you get instant alerts, boosting your responsiveness.
Webhook Integrations
Webhooks allow you to send form data to other services. Use them to connect with external applications.
- Choose a Webhook Service: Select a service like Zapier or Integromat.
- Generate Webhook URL: Create a webhook URL in the chosen service.
- Add Webhook URL to Form: Insert the URL in your form settings.
- Verify Connections: Test the webhook to ensure data transfer.
Webhooks provide a seamless way to integrate with third-party tools.
These advanced notification options enhance your WordPress form management.
Best Practices
Getting notified when someone submits a form on your WordPress site is essential. It ensures you respond promptly and don’t miss any important inquiries. Following the best practices can help you manage notifications effectively. Let’s explore some of these best practices below.
Ensuring Deliverability
To guarantee you receive notifications, make sure emails are delivered correctly. Use a reliable SMTP plugin to improve email deliverability. Setting up SMTP can help avoid spam filters.
- Install an SMTP plugin: Many plugins are available, such as WP Mail SMTP.
- Configure SMTP settings: Enter your SMTP server details and authentication info.
- Test email notifications: Send a test email to ensure everything works.
Regularly check your spam folder for missed notifications. Whitelist your domain to reduce the chance of emails landing in spam.
Monitoring And Maintenance
Monitoring your forms and maintaining settings is crucial. Regular checks ensure everything runs smoothly. Here’s a list to help you stay on track:
- Review form submissions: Check submissions daily to stay updated.
- Update plugins: Keep your form and SMTP plugins up-to-date for security.
- Backup your site: Regular backups can save you from data loss.
- Monitor server performance: Ensure your server handles email traffic efficiently.
Consider using a plugin for automatic backups. This ensures you always have a recent copy of your data.
By following these best practices, you can efficiently manage form notifications on your WordPress site.
Frequently Asked Questions
How Do I Get Email Notifications For Form Submissions In WordPress?
To get email notifications for form submissions in WordPress, use a form plugin like WPForms or Contact Form 7. Configure the notification settings within the plugin to send emails to your desired address whenever a form is submitted.
Can I Customize Form Submission Notifications In WordPress?
Yes, you can customize form submission notifications in WordPress using plugins like WPForms or Gravity Forms. These plugins allow you to modify the email subject, message, and recipient based on your needs.
Why Am I Not Receiving Form Submission Emails In WordPress?
If you’re not receiving form submission emails, check your spam folder first. Ensure your email settings in the form plugin are correct. You may also need an SMTP plugin to improve email deliverability.
How To Enable Sms Notifications For WordPress Form Submissions?
To enable SMS notifications for WordPress form submissions, use a plugin like WPForms with Twilio integration. Configure the plugin to send SMS alerts to your phone when a form is submitted.
Conclusion
Getting notified about form submissions in WordPress is straightforward. Follow the steps to ensure timely alerts. This enhances user engagement and efficiency. Implementing this feature helps manage responses effectively. Stay updated and never miss a form submission again.


