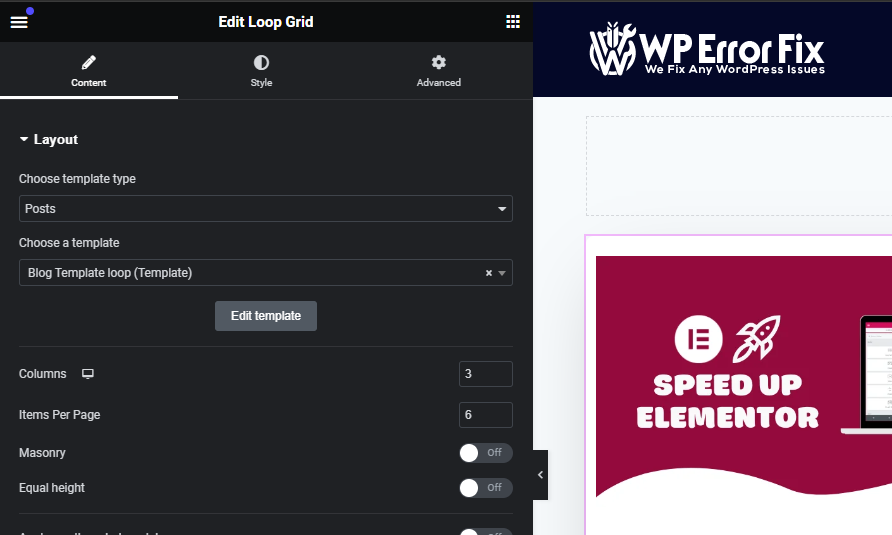
A Loop Grid in Elementor is a design feature that displays posts or custom post types in a structured grid layout. It allows for dynamic and customizable presentation of content.
Elementor’s Loop Grid is a powerful tool for web designers. It enables the creation of visually appealing, organized content displays. Users can easily showcase multiple posts, products, or custom post types. This feature enhances website aesthetics and user experience. It supports various layouts and styles, providing flexibility.
Users can customize the grid to match their site’s design. This tool is beneficial for blogs, portfolios, and e-commerce sites. It improves content engagement and navigation. The Loop Grid is user-friendly and requires no coding skills. It significantly enhances Elementor’s design capabilities.
Introduction To Loop Grid

The Loop Grid in Elementor is a powerful tool for web design. It helps display content in a structured and visually appealing way.
What Is Loop Grid?

The Loop Grid is a feature in Elementor that allows for dynamic content display. It organizes items in a repeatable grid layout.
With Loop Grid, you can create lists of posts, products, or any custom post type. This is done in a visually coherent manner.
Users can customize the layout, styling, and content of each grid item.
Importance In Web Design
The Loop Grid is crucial for modern web design. It enhances user experience by presenting content in an organized format.
Here are some key benefits:
- Improved Navigation: Users find content faster and easier.
- Better Engagement: Visually appealing grids keep users interested.
- SEO Benefits: Structured content is easier for search engines to index.
Designers can leverage Loop Grid to create stunning websites. It makes content management more efficient.
Using this shortcode, you can display a grid of posts or products. You can customize the number of columns and items displayed.
Setting Up Loop Grid
The Loop Grid in Elementor allows users to create dynamic content layouts. This feature is highly customizable and flexible, perfect for displaying posts, products, or any repeating content. Below, we’ll guide you through the setup process with easy steps.
Installation Process
To start, you need to have Elementor Pro installed. Follow these steps:
- Go to your WordPress Dashboard.
- Navigate to Plugins > Add New.
- Search for Elementor and click Install Now.
- After installation, click Activate.
- Repeat the steps for Elementor Pro.
Basic Configuration
Once Elementor Pro is active, you can configure the Loop Grid:
- Open the Elementor Editor.
- Drag and drop the Loop Grid into your layout.
- In the Content Tab, set the Query to your desired post type.
- Switch to the Style Tab to customize the look.
- Set the Columns Number and Rows Count as needed.
Use the Advanced Tab for more styling options. Here, you can add margins, padding, and other design elements.
| Setting | Description |
|---|---|
| Columns Number | Set how many columns you want. |
| Rows Count | Set the number of rows for your grid. |
| Query | Choose which posts to display. |
With the Loop Grid, you can create beautiful, dynamic layouts effortlessly. Happy designing!
Customizing Loop Grid
Loop Grid in Elementor lets you showcase posts in a grid layout. This section explains how to customize Loop Grid for a perfect look. You can tweak design options and advanced settings for a unique display.
Design Options
Design options allow you to change the look of your Loop Grid. You can modify the layout, colors, and typography easily.
- Layout: Choose from various grid styles like masonry or equal height.
- Colors: Change the background, text, and border colors.
- Typography: Adjust font family, size, and weight for better readability.
| Option | Description |
|---|---|
| Layout | Select different grid styles |
| Colors | Customize background, text, and border colors |
| Typography | Set font family, size, and weight |
Advanced Settings
Advanced settings provide more control over your Loop Grid. These settings help you enhance the grid’s functionality and appearance.
- Filters: Enable category or tag filters for easy navigation.
- Animation: Add hover effects or animations to make it interactive.
- Pagination: Choose from load more, infinite scroll, or numbered pagination.
- Enable filters for categories or tags.
- Add hover effects or animations.
- Choose the type of pagination.
By using these settings, you can create a stunning Loop Grid. Customize it to match your website’s style and improve user experience.
Dynamic Content Integration
Dynamic content integration allows Elementor users to create interactive websites. This feature helps fetch and display content from various sources. Using Loop Grid in Elementor, you can automate content updates. Below, we discuss how to connect to data sources and use custom fields.
Connecting To Data Sources
Loop Grid can connect to multiple data sources. This includes databases, APIs, and WordPress posts. Connecting to these sources ensures your content stays current. You can use Elementor’s dynamic tags to link your Loop Grid to these sources.
- Databases: Fetch data directly from your database.
- APIs: Integrate third-party services for real-time updates.
- WordPress Posts: Automatically display new blog posts or custom post types.
Using dynamic tags, you can map data fields to your grid layout. This makes your content dynamic and adaptable to changes.
Using Custom Fields
Custom fields add another layer of flexibility to Loop Grid. They allow you to include unique data for each post or item. You can use tools like ACF or Pods to create custom fields.
| Tool | Description |
|---|---|
| ACF | Advanced Custom Fields plugin for creating custom fields. |
| Pods | Another popular tool for managing custom fields. |
Custom fields can hold different types of data. This includes text, images, and other media. You can then display this data in your Loop Grid. This makes each grid item unique and tailored to your needs.
Example: Use a custom field for adding product prices to your Loop Grid.
- Create a custom field named “Product Price.”
- Add the field to your product posts.
- Map the custom field to a text element in your Loop Grid.
With these steps, your Loop Grid will display dynamic product prices. This adds a personalized touch to your Elementor designs.
Practical Use Cases
The Loop Grid feature in Elementor is powerful and versatile. It allows you to display your content in a visually appealing grid format. Below are some practical use cases where the Loop Grid can shine.
Portfolio Showcase
Using Loop Grid for a portfolio showcase is an excellent choice. It helps you present your work in a clean, organized manner.
- Display project thumbnails.
- Add project descriptions.
- Include call-to-action buttons.
| Feature | Benefits |
|---|---|
| Image Thumbnails | Quick visual reference for projects. |
| Descriptions | Provide context and details. |
| Call-to-Action | Encourage user interaction. |
Blog Post Listings
Organize your blog posts with the Loop Grid. It makes your content more accessible and engaging.
- Showcase featured images.
- Display post excerpts.
- Include read more links.
These elements help improve user experience and keep readers engaged. A well-organized blog post listing can boost your site’s SEO.
Performance Optimization
Optimizing performance is crucial for any website. It ensures users have a smooth experience. The Loop Grid feature in Elementor can impact performance. Understanding how to optimize it can make a big difference.
Improving Load Times
Improving load times is essential for a good user experience. The Loop Grid can slow down your site if not managed well. To enhance load times:
- Enable lazy loading for images within the Loop Grid.
- Use smaller image sizes to reduce load times.
- Minimize the number of items displayed per page.
Using these techniques, you can significantly speed up your page loads. Users will appreciate the faster loading times.
Minimizing Resource Usage
Minimizing resource usage helps your site perform better. The Loop Grid uses server resources. Efficient resource management can improve overall performance.
| Technique | Benefit |
|---|---|
| Reduce queries | Less server load |
| Cache loop results | Faster data retrieval |
| Limit dynamic content | Improved processing time |
Following these steps ensures your Loop Grid uses fewer resources. This keeps your site running smoothly.
Troubleshooting Common Issues
Working with the Loop Grid in Elementor can be exciting. But, sometimes, you may face a few challenges. This section will guide you through troubleshooting common issues. Follow the steps to ensure a smooth experience.
Error Resolution
Facing errors with the Loop Grid can be frustrating. Here are some common errors and their fixes:
| Error | Possible Cause | Solution |
|---|---|---|
| Grid Not Displaying | Plugin Conflict | Disable other plugins one by one. |
| Broken Layout | Outdated Theme | Update your theme to the latest version. |
| Slow Performance | Large Images | Optimize image sizes for web use. |
Best Practices
To avoid common issues, follow these best practices:
- Regularly update Elementor and all plugins.
- Use a child theme for customizations.
- Test changes on a staging site before going live.
- Backup your website regularly to prevent data loss.
By following these steps, you can ensure your Loop Grid functions smoothly. Happy designing!

Credit: mcstarters.com
Future Of Loop Grid
The Loop Grid in Elementor is evolving fast. This tool makes website design simple and efficient. Let’s explore the future of Loop Grid with upcoming features and community contributions.
Upcoming Features
Elementor plans to add many new features to the Loop Grid. These updates will make it more powerful and user-friendly.
- Dynamic Content Integration: Easily pull content from external sources.
- Advanced Styling Options: Customize the design with more options.
- Better Performance: Faster load times and smoother operation.
- Template Library: Access a library of pre-built templates.
Community Contributions
The Elementor community plays a big role in its development. Contributions from users help improve the Loop Grid.
| Contribution | Impact |
|---|---|
| Feedback | Helps identify bugs and needed features. |
| Custom Code | Adds unique functionalities. |
| Design Ideas | Offers fresh design perspectives. |
Community-driven contributions keep the Loop Grid innovative and user-centric. This collaboration ensures the tool meets diverse needs.

Credit: elementor.com
Frequently Asked Questions
What Is A Loop Grid In Elementor?
A Loop Grid in Elementor is a layout design tool. It helps create repetitive, structured content blocks. This is useful for blog posts, portfolios, and product listings. Each item in the grid follows a predefined template.
How Do You Create A Loop Grid?
To create a Loop Grid, open Elementor and select the Loop Grid widget. Customize the design and set the content source. Finally, save and apply the layout to your page.
Can You Customize Loop Grid Items?
Yes, you can customize Loop Grid items. Elementor allows you to modify the design and content of each item. This includes changing typography, colors, and layout.
Is Loop Grid Responsive?
Yes, Loop Grids are responsive. Elementor ensures that your grid looks good on all devices. You can preview and adjust the grid for desktops, tablets, and mobiles.
Conclusion
Unlock the potential of your website with Loop Grid in Elementor. This tool enhances design flexibility and user experience. It’s easy to use, even for beginners. Start creating dynamic and visually appealing layouts today. Implement Loop Grid to elevate your site’s functionality and aesthetics effortlessly.


