To add custom shape dividers to Elementor, use the built-in Shape Divider feature. Customize it through the Section settings.
Shape dividers can significantly enhance the visual appeal of your website. Elementor offers a built-in feature to easily add these custom dividers. This tool allows you to create unique, eye-catching transitions between sections. Shape dividers can be customized in terms of style, color, and size.
These enhancements can make your site stand out and improve user experience. This guide will help you understand how to effectively use shape dividers in Elementor. Follow these steps to give your website a professional and polished look. Shape dividers are a simple yet powerful way to elevate your site’s design.
Introduction To Shape Dividers
Shape dividers add a unique visual element to your website. They create a seamless transition between sections, enhancing the overall design. With Elementor, you can easily add custom shape dividers to your pages.
What Are Shape Dividers?
Shape dividers are graphical elements placed between sections on a webpage. They can be curves, zigzags, waves, or any custom shape. Shape dividers visually separate content areas, making them more appealing.
Elementor offers various built-in shape dividers. You can also add custom shapes to match your brand. These elements make your website stand out and look professional.
Benefits Of Using Shape Dividers
- Enhanced Visual Appeal: Shape dividers make your website look modern and stylish.
- Seamless Transitions: They create smooth transitions between different sections.
- Brand Consistency: Custom shapes help maintain a consistent brand identity.
- User Engagement: Visually appealing pages keep users engaged longer.
Adding shape dividers to your Elementor design is simple. Follow these steps:
- Open the Elementor editor for your page.
- Select the section where you want to add a shape divider.
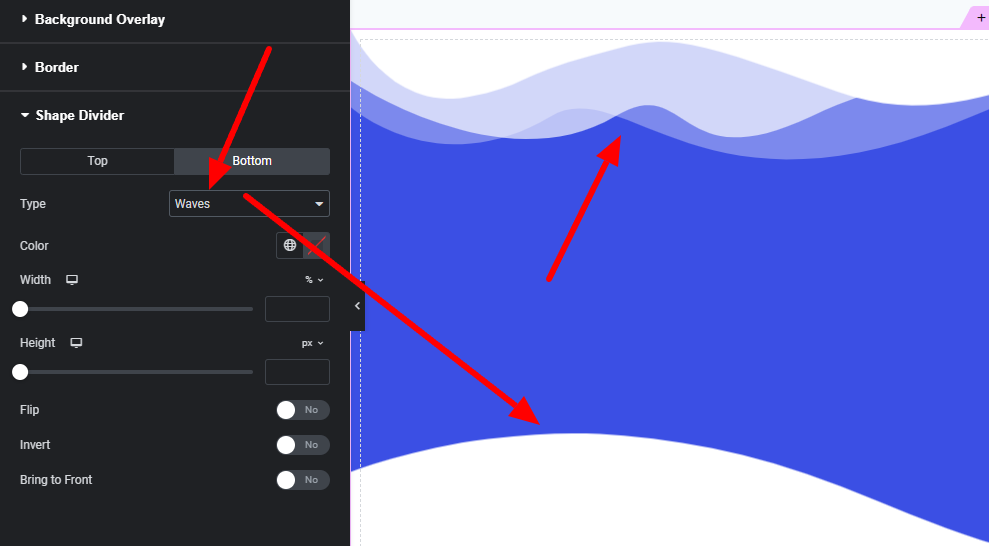
- Go to the “Style” tab and find the “Shape Divider” option.
- Choose the position (top or bottom) and the type of shape.
- Customize the shape’s color, width, and height to fit your design.
Using shape dividers can dramatically improve your website’s aesthetics. They are easy to implement and customize within Elementor.
Credit: happyaddons.com
Getting Started With Elementor
Elementor is a popular tool for building WordPress websites. It offers flexibility and ease of use. This guide helps you start with Elementor.
Installing Elementor
To install Elementor, follow these simple steps:
- Go to your WordPress dashboard.
- Navigate to Plugins > Add New.
- Search for Elementor.
- Click Install Now and then Activate.
Now, Elementor is ready for use on your site.
Basic Features Of Elementor
Elementor offers many features to create beautiful websites. Here are some key features:
- Drag and Drop Editor: Easily move elements around.
- Responsive Design: Your site looks great on all devices.
- Pre-designed Templates: Start quickly with ready-made designs.
- Custom Widgets: Add buttons, images, and more.
These features help you create a stunning website with ease.
Elementor is a powerful tool for website building. Follow these steps to get started quickly.
Custom Shape Dividers In Elementor
Elementor is a popular page builder for WordPress. It helps users design stunning websites without coding. One of its exciting features is the Shape Divider. Shape Dividers add style and creativity to your sections. But the default options can be limiting. This post explores how to add custom shape dividers to Elementor.
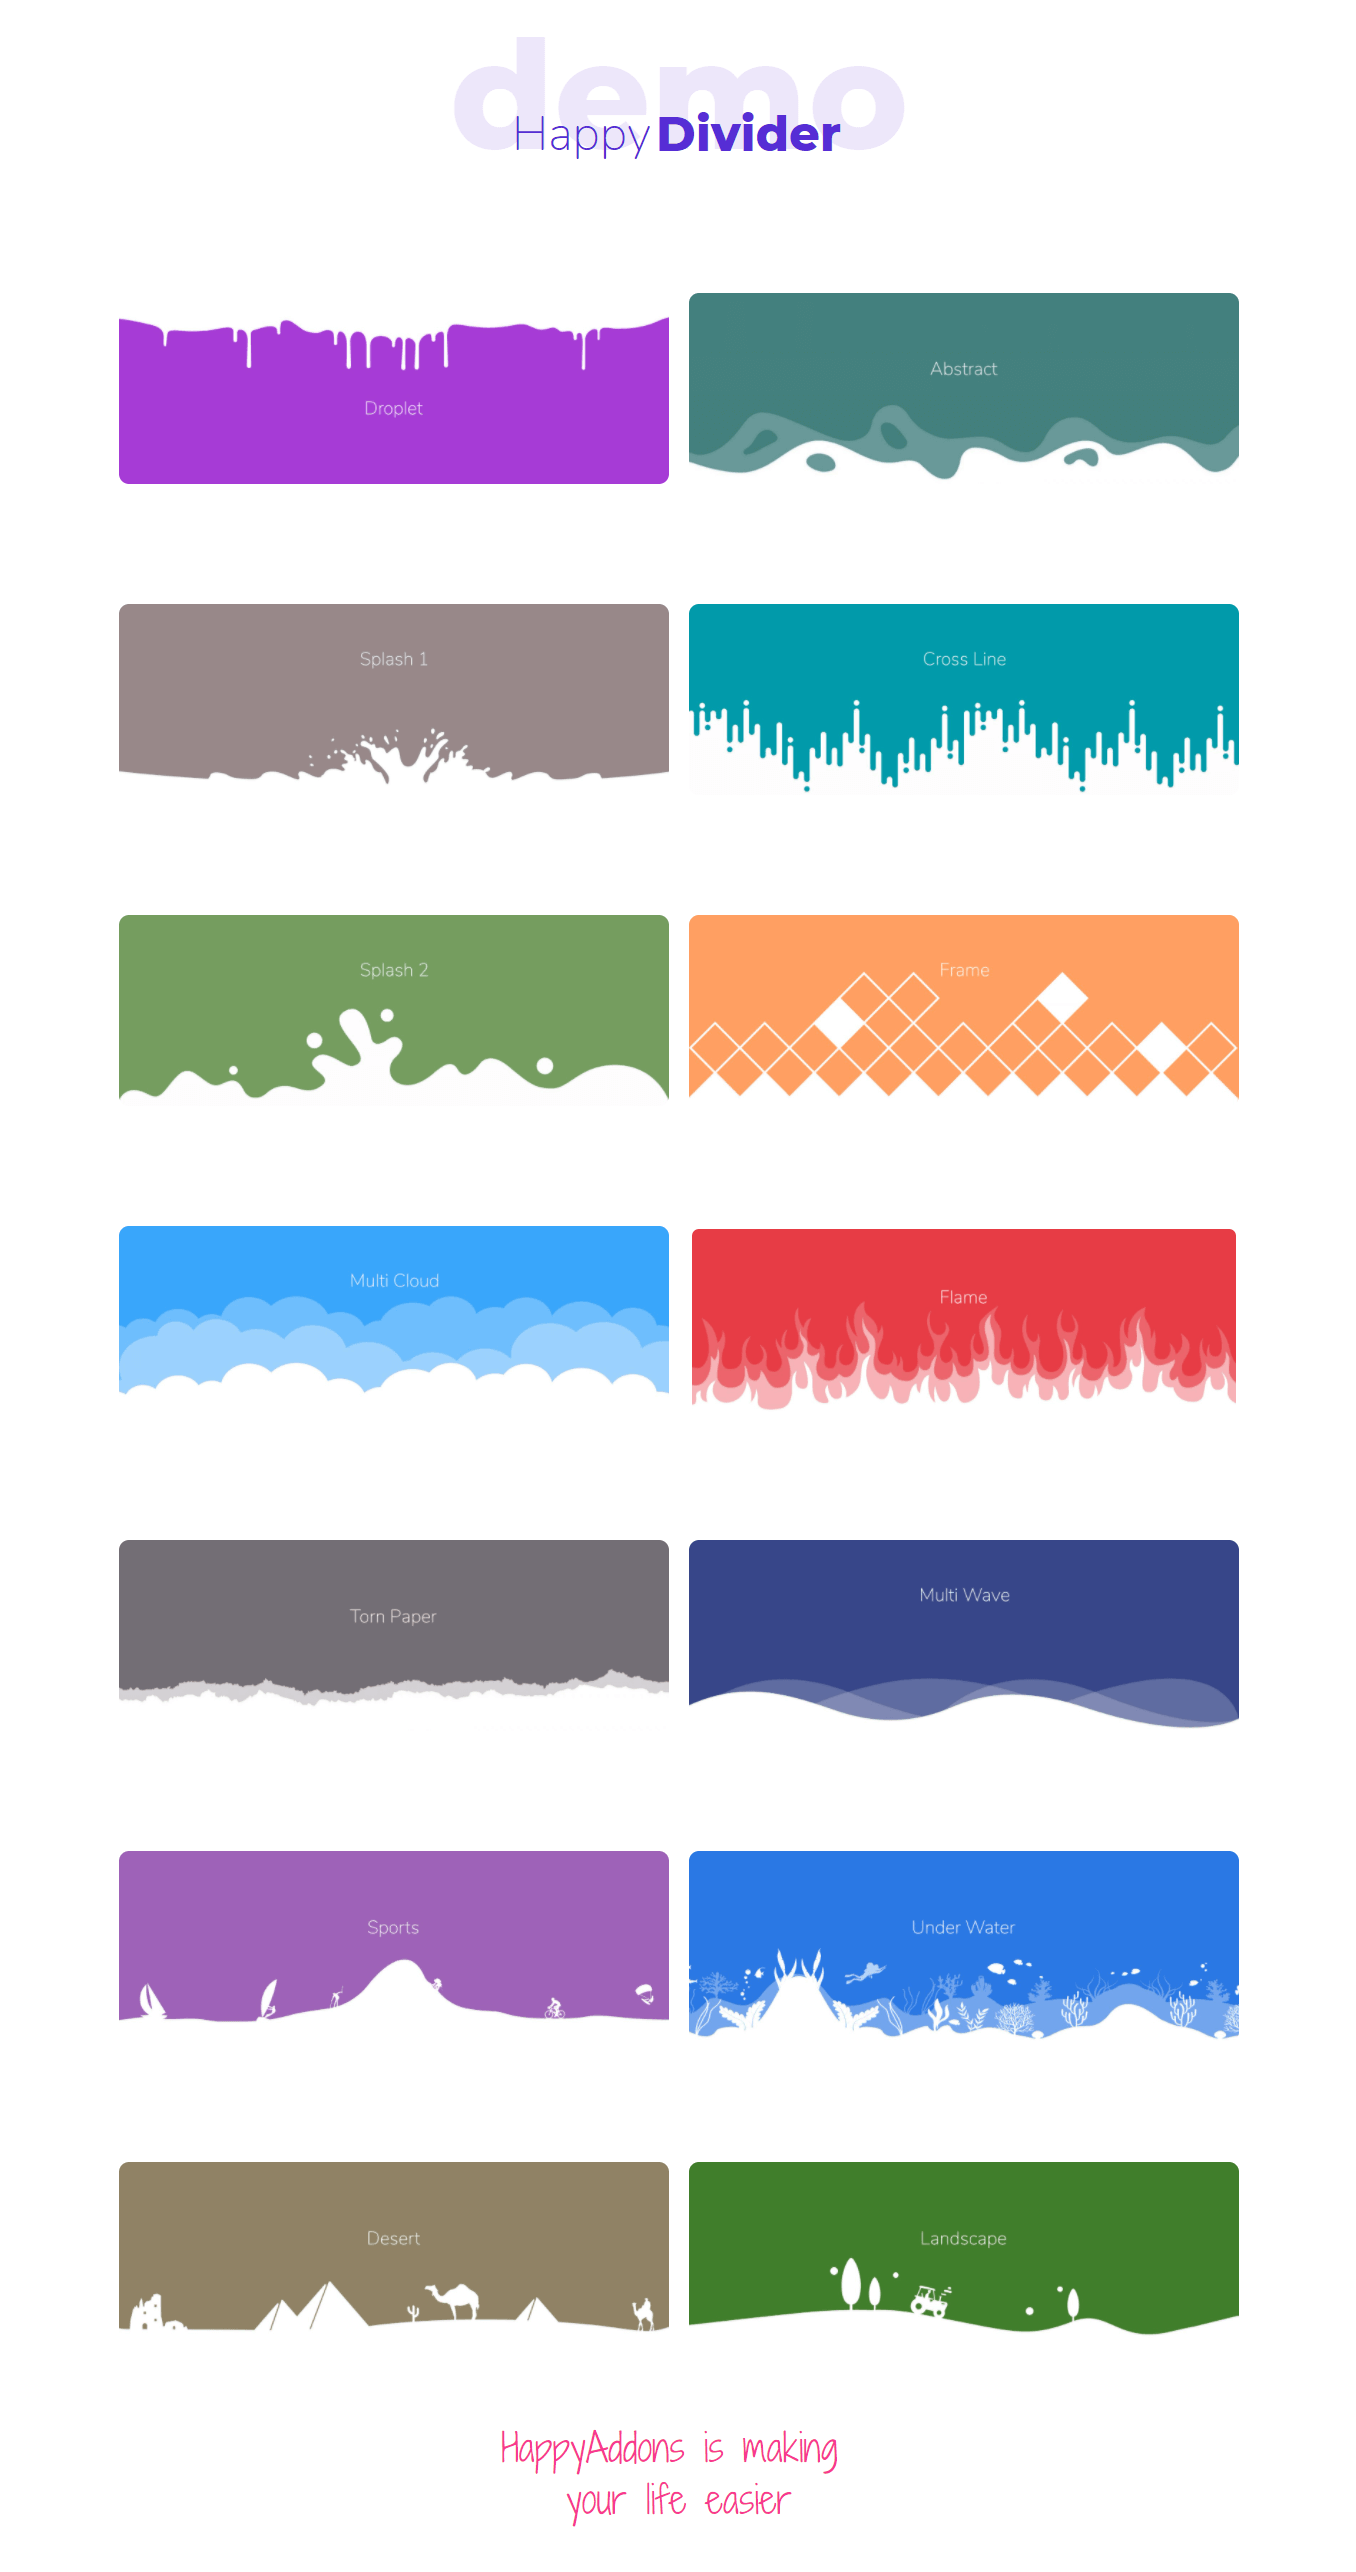
Default Shape Divider Options
Elementor provides several default shape dividers. These include:
- Mountains
- Waves
- Arrows
- Clouds
- Triangles
These default shapes are easy to use. They can enhance the look of your website. But, they might not fit everyone’s needs.
Limitations Of Default Options
Default shape dividers have limitations. They don’t offer much variety. Users cannot customize them extensively. This can restrict creativity. For instance, you might want a unique shape for your brand. But the default options might not have it. Also, the colors and sizes are limited. This can make your site look similar to others using Elementor.
Here’s a brief comparison:
| Feature | Default Options | Custom Shape Dividers |
|---|---|---|
| Variety | Limited | Unlimited |
| Customization | Basic | Advanced |
| Uniqueness | Common | Unique |
Custom shape dividers offer a solution. They allow for more creativity. You can design shapes that fit your brand. You can choose any color, size, and style. This makes your website stand out. Custom dividers can transform a site from ordinary to extraordinary.
Credit: m.youtube.com
Creating Custom Shape Dividers
Adding custom shape dividers to Elementor can make your website look unique. Shape dividers help to create visual separation between sections. This guide will help you create your own custom shape dividers.
Tools Needed
To create custom shape dividers, you need the following tools:
- Elementor: A popular page builder for WordPress.
- Graphic Design Software: Tools like Adobe Illustrator or Sketch.
- SVG File Format: Scalable Vector Graphics for the best quality.
- Shape Dividers Plus for Elementor Plugin
Designing Your Shape Divider
Designing your shape divider is an important step. Follow these steps to design a custom shape divider:
- Open your graphic design software.
- Create a new document with the desired dimensions.
- Use shapes, lines, and curves to design your divider.
- Ensure the divider is symmetrical for better alignment.
- Save your design as an SVG file.
Here is a simple example of SVG code for a wave shape divider:
<svg xmlns="http://www.w3.org/2000/svg" viewBox="0 0 1440 320">
  <path fill="#0099ff" fill-opacity="1" d="M0,96L48,122.7C96,149,192,203,288,229.3C384,256,480,256,576,234.7C672,213,768,171,864,138.7C960,107,1056,85,1152,101.3C1248,117,1344,171,1392,197.3L1440,224L1440,320L1392,320C1344,320,1248,320,1152,320C1056,320,960,320,864,320C768,320,672,320,576,320C480,320,384,320,288,320C192,320,96,320,48,320L0,320Z"></path>
</svg>
This SVG creates a simple wave shape with a blue fill color (#0099ff). You can adjust the viewBox dimensions, fill color, and the wave path (d attribute) to customize the wave divider. The wave can be used as a divider between sections on a webpage for a nice, flowing transition
Upload this SVG file to your Elementor page. Use the shape divider settings to customize the appearance further.
Adding Custom Shape Dividers
Adding custom shape dividers to Elementor sections can greatly enhance your website’s visual appeal. These dividers provide a unique look, making your content stand out. This guide will help you add custom shape dividers to Elementor with ease.
Uploading Your Design
To start, you need a custom shape design. Create this design using graphic software like Adobe Illustrator or Photoshop. Save your design as a PNG or SVG file.
Next, upload your design to the WordPress media library. Go to Media > Add New and select your file. Ensure the file is uploaded successfully.
Here’s a quick table to summarize the steps:
| Step | Action |
|---|---|
| 1 | Create your design in graphic software |
| 2 | Save as PNG or SVG file |
| 3 | Upload to WordPress media library |
Applying To Sections
After uploading your design, open the Elementor editor. Select the section where you want to add the custom shape divider.
In the section settings, navigate to the Style tab. Scroll down to the Shape Divider section.
- Select Top or Bottom depending on where you want the divider.
- Choose Custom from the shape options.
- Click the Upload button and select your previously uploaded design.
Your custom shape divider is now applied to the section. Adjust its settings for better alignment and size.
- Go to the Shape Divider section.
- Select Top or Bottom.
- Choose Custom from the shape options.
- Upload your design.
Now, your custom shape divider is live on your website. Refresh the page to see the changes.

Credit: elementor.com
Styling Your Shape Dividers
Adding custom shape dividers to Elementor can transform your website. Correct styling makes all the difference. Let’s dive into making your shape dividers stand out.
Color And Opacity
Choosing the right color is essential. Use colors that match your site’s theme. A cohesive color scheme creates visual harmony.
Adjusting the opacity can add depth. High opacity can make dividers bold. Lower opacity makes them subtle. This can create a layered effect.
| Opacity Level | Visual Effect |
|---|---|
| 100% | Bold and prominent |
| 50%-70% | Balanced and noticeable |
| Below 50% | Subtle and layered |
Responsive Design Considerations
Responsive design ensures your shape dividers look great on all devices. Test dividers on mobile, tablet, and desktop screens.
- Use CSS media queries to adjust styles for different screens.
- Check how shape dividers scale on smaller screens. Ensure they do not overlap text or images.
- Adjust heights and widths for various devices. This ensures consistent appearance.
Implementing these tips will enhance your site’s visual appeal. Your custom shape dividers will look stunning on all devices.
Advanced Tips And Tricks
Enhancing your Elementor designs with custom shape dividers can be fun and rewarding. Explore advanced tips and tricks to elevate your design game. Discover how to use SVGs and animate your shape dividers effectively.
Using Svgs For Shape Dividers
SVGs offer a flexible way to create unique shape dividers. They scale without losing quality, ensuring your designs remain crisp.
To use SVGs in Elementor:
- First, create or download an SVG file.
- Upload the SVG to your WordPress media library.
- In the shape divider settings, select ‘Custom’ and upload your SVG.
SVGs give you endless design possibilities. Experiment with different shapes and styles.
Animating Shape Dividers
Animating shape dividers can make your website more engaging. Add simple animations for a dynamic look.
Follow these steps to animate your shape dividers:
- Install and activate an animation plugin like ‘Elementor Animations’.
- Select the shape divider you want to animate.
- In the animation settings, choose your desired animation effect.
Animations can include:
| Effect | Description |
|---|---|
| Fade | Gradually appears or disappears. |
| Slide | Slides in from a direction. |
| Rotate | Rotates around an axis. |
Choose animations that match your website’s style. Too many animations can be distracting.
Common Issues And Fixes
Adding custom shape dividers to Elementor can elevate your website’s design. Yet, you may encounter some common issues. This section aims to address these problems and provide effective solutions.
Troubleshooting Display Problems
Display issues might arise due to improper settings or conflicts. Here are some steps to resolve these issues:
- Ensure the shape divider is enabled in the Elementor settings.
- Check if the shape divider’s color contrasts with the background.
- Clear your browser cache to see if that resolves the issue.
If the shape divider is still not showing, inspect the CSS. Here is a sample CSS code to ensure the shape divider displays correctly:
.elementor-shape-divider {
  display: block !important;
}
If the issue persists, deactivate other plugins to check for conflicts.
Ensuring Cross-browser Compatibility
Different browsers may render shape dividers inconsistently. Ensure your design looks good on all major browsers. Follow these steps:
- Test your website on Google Chrome, Firefox, Safari, and Edge.
- Use CSS prefixes for better compatibility. Here is an example:
/ Prefixes for cross-browser compatibility /
.shape-divider {
  -webkit-clip-path: polygon(...);
  clip-path: polygon(...);
}
Use online tools like Can I Use to check CSS properties support.
Finally, if a particular browser doesn’t support the shape divider, provide a fallback design. This ensures a consistent user experience across all browsers.
Conclusion
Custom shape dividers add a unique touch to your Elementor designs. They enhance visual appeal and user engagement. By following simple steps, you can easily implement them. Experiment with different shapes and styles. Transform your website’s look effortlessly. Start customizing your Elementor pages today for a distinct, professional appearance.