
A 404 error after migrating WordPress often occurs due to broken permalinks or misconfigured .htaccess files. Fixing these issues can resolve the error quickly.
Migrating a WordPress site can be challenging, especially when you encounter errors like the dreaded 404 page not found. This error often stems from broken permalinks or incorrect .htaccess configurations, which can disrupt your site’s accessibility. Understanding these common issues helps in addressing them efficiently, ensuring a seamless transition.
Fixing the. htaccess file and resetting permalinks are usually effective solutions. Properly managing these elements ensures your WordPress site remains functional and user-friendly post-migration. Follow these steps to diagnose and resolve the 404 error, and get your site back on track.
Common Causes Of 404 Errors
Migrating a WordPress site can be tricky. One common issue is the dreaded 404 error. This error means that the requested page can’t be found. Understanding the common causes can help you fix it quickly.
Broken Permalinks
Broken permalinks often cause 404 errors. Permalinks are the URLs for your posts and pages. After migration, these links might not work. You can fix this by resetting your permalinks.
To reset permalinks, follow these steps:
- Go to your WordPress dashboard.
- Navigate to Settings > Permalinks.
- Select a different permalink structure.
- Save changes.
- Revert to your original structure and save again.
Incorrect .htaccess File
An incorrect .htaccess file can also lead to 404 errors. This file controls how URLs are handled. A corrupted or missing .htaccess file may cause issues.
To check your .htaccess file:
- Access your site via FTP or cPanel.
- Locate the
.htaccessfile in your root directory. - If missing, create a new file named
.htaccess. - Add the following default code:
# BEGIN WordPress RewriteEngine On RewriteBase / RewriteRule ^index\.php$ - [L] RewriteCond %{REQUEST_FILENAME} !-f RewriteCond %{REQUEST_FILENAME} !-d RewriteRule . /index.php [L] # END WordPress - Save and upload the file back to your server.
Missing Media Files
Missing media files can result in 404 errors. During migration, some files may not transfer. This includes images, videos, and other media.
To ensure all media files are present:
- Check your wp-content/uploads directory.
- Verify that all media files are intact.
- Re-upload any missing files through the WordPress Media Library.
If you use a backup plugin, restore the media files from the backup.
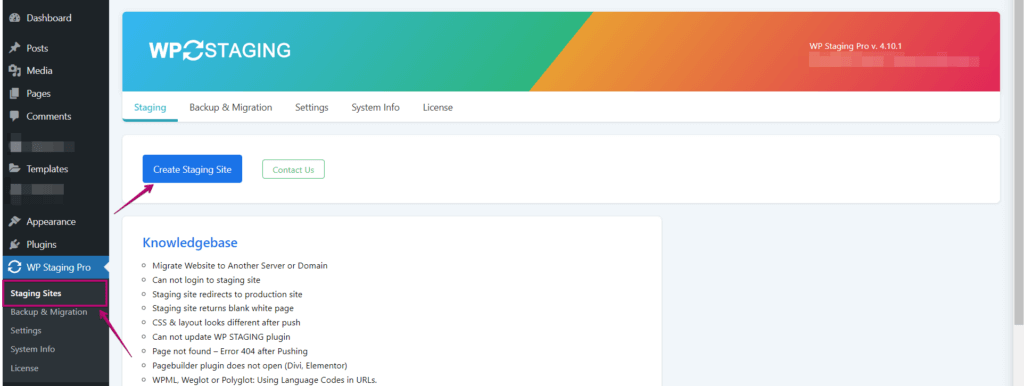
Credit: wp-staging.com
Checking Permalink Settings
After migrating your WordPress site, encountering a 404 error is common. One of the first steps to troubleshoot this issue is checking the Permalink Settings. This ensures that your website URLs are correctly configured.
Accessing Permalink Settings
To access the Permalink Settings, follow these steps:
- Log in to your WordPress Admin Dashboard.
- Navigate to the Settings menu.
- Select Permalinks from the dropdown list.
This will open the Permalink Settings page where you can adjust and save your URL settings.
Resetting Permalinks
If you’re facing a 404 error, resetting permalinks can help. Follow these steps:
- On the Permalink Settings page, choose a different permalink structure.
- Click the Save Changes button.
- Now, select your original permalink structure again.
- Click Save Changes once more.
This process refreshes your permalink settings and can resolve the 404 error.
If the issue persists, consider checking the .htaccess file. Ensure it contains the correct WordPress rewrite rules. Below is an example of the default .htaccess content:
# BEGIN WordPress

RewriteEngine On
RewriteBase /
RewriteRule ^index\.php$ - [L]
RewriteCond %{REQUEST_FILENAME} !-f
RewriteCond %{REQUEST_FILENAME} !-d
RewriteRule . /index.php [L]

# END WordPress
Ensure this code is present in your .htaccess file to support your permalink structure.
Editing The .htaccess File
Facing a 404 error after migrating your WordPress site can be frustrating. One effective way to resolve this is by editing the .htaccess file. This file controls how URLs are handled on your server. It can fix many common issues including the dreaded 404 error.
Finding The .htaccess File
First, you need to locate the .htaccess file. This file is usually in your site’s root directory. You can access it through an FTP client or your hosting control panel.
- Open your FTP client and connect to your server.
- Navigate to the root directory of your WordPress installation.
- Look for the .htaccess file. It might be hidden, so enable the option to view hidden files.
If you cannot find it, create a new text file and name it .htaccess.
Adding Default Code
After locating the file, you need to add the default WordPress code. This code helps redirect URLs correctly and fix the 404 error.
# BEGIN WordPress
RewriteEngine On
RewriteBase /
RewriteRule ^index\.php$ - [L]
RewriteCond %{REQUEST_FILENAME} !-f
RewriteCond %{REQUEST_FILENAME} !-d
RewriteRule . /index.php [L]
# END WordPress
Follow these steps to add the code:
- Open the .htaccess file in a text editor.
- Copy the default WordPress code provided above.
- Paste the code into the .htaccess file.
- Save the file and upload it back to your server.
After saving, check your website to see if the 404 error is resolved.
If the error persists, ensure your server supports mod_rewrite and that the .htaccess file has the correct permissions.
Re-uploading Media Files
Experiencing a WordPress Error 404 after migration can be frustrating. Often, this error affects media files such as images and videos. Re-uploading these files is a simple fix. This section will guide you through the process.
Locating Missing Files
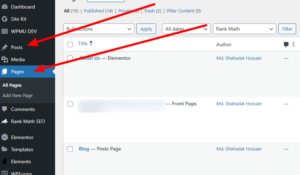
First, locate the missing files. Use the WordPress Media Library to identify broken links. Navigate to Media and then Library. Look for files that show broken thumbnails or missing icons.
You can also check your website’s content. Look for missing images or videos in posts and pages. Note down the file names and paths.
Uploading Via Media Library
Once you have identified the missing files, re-upload them. Go to Media and click on Add New. Drag and drop the missing files or click Select Files to upload them.
Ensure the file names match the original ones. This will restore the broken links in your content. If the filenames are different, update the URLs in your posts and pages.
Here is a simple step-by-step guide to upload media files:
- Go to Media > Add New.
- Drag and drop the file or click Select Files.
- Ensure the file name matches the original.
- Update the URL in your content if needed.
Re-uploading media files can resolve the WordPress Error 404 after migration. This ensures your content is displayed correctly.
Database Search And Replace
After migrating a WordPress site, you may encounter the dreaded Error 404. This often happens because of incorrect URLs in your database. To fix this, you need to perform a database search and replace. This process updates old URLs to the new ones.
Using A Plugin
Plugins can make the search and replace process easy. One popular plugin is Better Search Replace.
Here’s how to use it:
- Install and activate the plugin.
- Go to Tools > Better Search Replace.
- Enter your old URL in the “Search for” field.
- Enter the new URL in the “Replace with” field.
- Select all tables.
- Check the box for a dry run to test.
- Click Run Search/Replace.
This plugin updates your URLs in seconds. It’s user-friendly and safe.
Manual Database Update
Some prefer to update the database manually. This method involves using phpMyAdmin or another database management tool.
Follow these steps:
- Log in to your web hosting control panel.
- Open phpMyAdmin.
- Select your WordPress database.
- Click on the SQL tab to run a query.
- Enter the following SQL command:
UPDATE wp_options SET option_value = replace(option_value, 'http://old-url.com', 'http://new-url.com') WHERE option_name = 'home' OR option_name = 'siteurl';
UPDATE wp_posts SET guid = replace(guid, 'http://old-url.com','http://new-url.com');
UPDATE wp_posts SET post_content = replace(post_content, 'http://old-url.com', 'http://new-url.com');
UPDATE wp_postmeta SET meta_value = replace(meta_value,'http://old-url.com','http://new-url.com');
This SQL command updates URLs in the options, posts, and postmeta tables.
Be cautious with manual updates. Always back up your database first.
Clearing Cache
After migrating your WordPress site, you might encounter a 404 error. This can be frustrating. One effective solution is to clear your cache. This process can resolve many issues. Let’s dive into how you can clear your cache.
Browser Cache
Your browser stores files to load websites faster. This is called browser cache. Sometimes, old cached files cause errors. Follow these steps to clear your browser cache:
- Open your browser settings.
- Navigate to the “Privacy” or “History” section.
- Select “Clear browsing data.”
- Choose the time range and data types.
- Click “Clear data” to complete the process.
Clearing your browser cache can often resolve the 404 error. This refreshes your browser with the latest site files.
WordPress Cache Plugin
WordPress sites often use cache plugins. These plugins store static versions of your site. This speeds up load times. But after migration, they might show outdated pages. Here’s how you can clear cache using a WordPress plugin:
- Log in to your WordPress admin dashboard.
- Go to the “Plugins” section.
- Find your installed caching plugin.
- Navigate to the plugin’s settings.
- Look for the “Clear Cache” or “Purge Cache” button.
- Click the button to clear the cache.
Popular caching plugins include WP Super Cache and W3 Total Cache. Each plugin has a different interface. Ensure you follow the specific steps for your plugin.
Clearing your cache is an easy fix for many WordPress migration issues. Always start here before diving into more complex solutions.
Checking Theme And Plugin Conflicts
Encountering a WordPress Error 404 after migration is common. This error often stems from theme or plugin conflicts. Identifying and resolving these conflicts is crucial. Let’s explore how to check for these issues.
Disabling Plugins
Plugins can often cause conflicts. Here’s how to disable them:
- Go to your WordPress dashboard.
- Navigate to Plugins and select Installed Plugins.
- Check all plugins.
- Select Deactivate from the bulk actions dropdown menu.
- Click Apply.
After disabling all plugins, check if the 404 error persists. If the error is resolved, reactivate plugins one by one. Identify the conflicting plugin and look for alternatives or updates.
Switching To Default Theme
If disabling plugins does not solve the issue, the theme might be the problem. Switch to a default WordPress theme:
- Go to your WordPress dashboard.
- Navigate to Appearance and select Themes.
- Activate a default theme like Twenty Twenty-One.
Check if the 404 error is gone. If switching the theme fixes the issue, your previous theme likely caused the conflict. Consider updating or replacing the theme.
By systematically disabling plugins and switching themes, you can quickly identify and resolve conflicts causing the WordPress Error 404 after migration.
Seeking Professional Help
Encountering a 404 error after migrating your WordPress site can be frustrating. Seeking professional help can save you time and stress. Here are ways to get the help you need:
Hiring A Developer
Hiring a developer can be a great option. Developers have the expertise to fix 404 errors swiftly. They understand the intricacies of WordPress and server configurations. Here are some steps to follow when hiring a developer:
- Look for a developer with WordPress experience.
- Check their past projects and client reviews.
- Discuss your issue in detail before hiring.
- Agree on a timeline and cost before starting.
By following these steps, you ensure you hire a competent professional. This can result in a quick resolution of your 404 error.
Contacting Hosting Support
Your hosting provider can also assist with 404 errors. They have access to server logs and settings. They can diagnose and fix issues that may not be obvious. Here’s how to contact hosting support effectively:
- Log in to your hosting account.
- Navigate to the support or help section.
- Submit a detailed ticket or start a live chat.
- Provide specific information about the 404 error.
Most hosting providers offer 24/7 support. They can quickly identify and resolve issues. This ensures your site runs smoothly after migration.
Credit: wp-staging.com
Frequently Asked Questions
Why Do I Get A 404 Error After Migration?
A 404 error after migration usually occurs due to broken links or incorrect permalink settings. Verify your site’s permalink structure and update any broken links to fix the issue.
How Can I Fix WordPress 404 Errors?
To fix WordPress 404 errors, go to Settings > Permalinks and click “Save Changes. ” This action refreshes your permalink structure, resolving common 404 errors.
Are Plugins Causing 404 Errors After Migration?
Yes, some plugins can cause 404 errors after migration. Deactivate all plugins and reactivate them one by one to identify the culprit.
Can .htaccess File Cause 404 Errors?
Yes, an incorrect. htaccess file can cause 404 errors. Ensure your. htaccess file has the correct rewrite rules for WordPress.
Conclusion
Resolving the WordPress Error 404 after migration is crucial for maintaining your site’s functionality. Follow the steps outlined to fix this issue effectively. Regularly updating your links and permalinks can prevent future 404 errors. Ensure your website remains user-friendly and optimized for search engines, enhancing overall user experience and SEO performance.