
For Elementor Image Optimizer, the ideal image size is 1920px wide. This ensures fast loading and high-quality visuals.
Image optimization is crucial for any website, especially for those using Elementor. Properly sized images enhance loading speed, improve user experience, and boost SEO rankings. A width of 1500px strikes a balance between quality and performance. This size is large enough to appear crisp on most screens yet small enough to load quickly.
Compress images without losing quality to maintain this balance. Tools like TinyPNG or ImageOptim can help. Always test your website’s speed after optimizing images to ensure optimal performance. This approach not only improves site aesthetics but also contributes to higher search engine rankings and better user engagement.
Credit: www.youtube.com
Importance Of Image Optimization
Image optimization is crucial for any website. Optimized images improve site speed, enhance user experience, and boost search engine rankings. Proper image sizes reduce load times and save bandwidth. Let’s explore why image optimization is essential.
Site Speed Impact
Website speed is vital for user retention. Large, unoptimized images slow down your site. A slow site frustrates visitors and increases bounce rates.
Optimized images load faster. This improves your Google PageSpeed Insights score. Faster load times mean higher search engine rankings.
Table: Benefits of Optimized Images on Site Speed
| Aspect | Impact |
|---|---|
| Page Load Time | Reduced |
| Bandwidth Usage | Lowered |
| User Retention | Increased |
User Experience
Image optimization enhances the user experience. Fast-loading images keep users engaged. They provide a smooth and enjoyable browsing experience.
Visitors expect quick loading times. Optimized images ensure that your site meets these expectations. This leads to higher user satisfaction and longer site visits.
Bullet Points: How Optimized Images Improve User Experience
- Faster page loading
- Better mobile experience
- Improved visual quality
Search Engine Rankings
Search engines prioritize fast-loading websites. Optimized images contribute to a faster site. This improves your site’s SEO performance.
Google rewards faster sites with higher rankings. Optimizing images helps you achieve better search engine visibility. This can lead to increased traffic and conversions.
- Choose the right file format (JPEG, PNG, WebP)
- Compress images without losing quality
- Resize images to fit your layout
- Use descriptive file names
- Implement lazy loading
Choosing The Right Image Size
Choosing the right image size is crucial for your website. It ensures fast loading times and better user experience. Using the Elementor Image Optimizer helps achieve this. Let’s dive into the key factors.
Dimensions Vs. File Size
Understanding the difference between dimensions and file size is important. Dimensions refer to the width and height of an image, measured in pixels. File size is the amount of space the image takes up, measured in kilobytes (KB) or megabytes (MB).
| Image Dimension | File Size |
|---|---|
| 800×600 px | 150 KB |
| 1920×1080 px | 1 MB |
Smaller dimensions often result in smaller file sizes. This means faster loading times. But, too small dimensions can affect image quality.
Resolution Considerations
Resolution is another key factor. It affects both the image quality and file size. High-resolution images are detailed, but they also have larger file sizes.
- For web use, a resolution of 72 dpi is ideal.
- Print media often requires 300 dpi or higher.
Using the right resolution ensures images look good without slowing down your site. Compressing high-resolution images can reduce file size while maintaining quality.
Use tools like the Elementor Image Optimizer to balance quality and performance. This ensures your images load quickly and look great.
Elementor’s Image Optimization Tools
Elementor makes it easy to optimize images for your website. Optimized images improve site speed and user experience. Elementor offers built-in features and third-party plugins for image optimization.
Built-in Features
Elementor includes several built-in features for image optimization:
- Responsive Image Resizing: Automatically adjusts image size for different devices.
- Lazy Load: Loads images only when they appear in the viewport.
- Retina Support: Ensures high-resolution images on retina displays.
These features help improve page load times and user experience.
Third-party Plugins
For advanced image optimization, you can use third-party plugins with Elementor:
- Smush: Compresses images without losing quality.
- EWWW Image Optimizer: Reduces image file sizes for faster loading.
- ShortPixel: Optimizes images and converts them to WebP format.
These plugins integrate seamlessly with Elementor. They offer more control over image optimization.
| Plugin | Key Feature |
|---|---|
| Smush | Lossless Compression |
| EWWW Image Optimizer | File Size Reduction |
| ShortPixel | WebP Conversion |
Best Practices For Image Formats
Optimizing images for your website is crucial. The right format can boost loading speed. Let’s explore the best image formats for Elementor Image Optimizer.
Jpeg Vs. Png
JPEG is great for photos. It offers a good balance between quality and file size. JPEGs are ideal for images with many colors and details.
PNG works best for graphics with text. It supports transparency, making it perfect for logos and icons. PNG files are larger but maintain high quality.
| Format | Best Use | Quality | File Size |
|---|---|---|---|
| JPEG | Photos | High | Small |
| PNG | Graphics with text | Very High | Large |
Webp Advantages
WebP is a modern image format. It provides superior compression, reducing file size significantly without losing quality. WebP supports both lossy and lossless compression.
- Smaller file sizes
- Faster loading times
- Supports transparency
- Works for both photos and graphics
Using WebP images can improve your site’s performance. Many browsers support WebP, making it a versatile choice for web images.
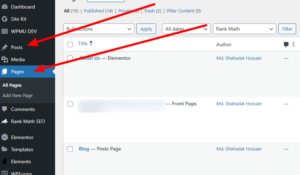
Steps To Optimize Images In Elementor
Optimizing images in Elementor improves your website’s load speed. It also enhances user experience and boosts SEO performance. Follow these simple steps to ensure your images are perfectly optimized.
Upload Process
To start, upload your images directly to the Elementor media library. Ensure each image is in the correct format, such as JPEG for photos and PNG for graphics. Always use high-quality images to maintain visual appeal.
Use descriptive filenames for better SEO. Instead of “IMG1234.jpg,” use “beautiful-sunset.jpg.” This helps search engines understand your image content.
Resizing And Compression
Resize your images to fit their display dimensions. Large images slow down your website. Use tools like Adobe Photoshop or online services to resize images.
After resizing, compress your images to reduce file size. Tools like TinyPNG or ImageOptim are excellent choices. They maintain quality while reducing file size.
| Image Type | Suggested Size | Compression Tool |
|---|---|---|
| Hero Image | 1920×1080 pixels | TinyPNG |
| Thumbnail | 150×150 pixels | ImageOptim |
| Blog Post Image | 800×600 pixels | JPEG-Optimizer |
By following these steps, you ensure your images load faster and look great. Optimize your images in Elementor for a better-performing website.
Credit: www.youtube.com
Common Pitfalls To Avoid
Using Elementor Image Optimizer can significantly enhance your website’s performance. However, there are common mistakes users often make. Avoid these pitfalls to ensure your images look great and load quickly.
Over-compression Issues
Over-compression can degrade image quality. Blurry or pixelated images can harm your site’s professionalism. Balance is essential when compressing images.
- Check image quality after compression.
- Use tools that allow adjustable compression levels.
- Test different compression rates to find the sweet spot.
Over-compressed images can negatively impact user experience. They may also affect your site’s SEO ranking. Ensure your images are clear and high-quality.
Ignoring Responsive Design
Responsive design is critical for modern websites. Ignoring responsive design means your images might not display well on all devices.
- Use images that adjust to screen size.
- Test your site on different devices.
- Use Elementor’s responsive settings for images.
Optimized images for desktops might not look good on mobiles. Use multiple image sizes for different devices. This ensures a seamless user experience across all platforms.
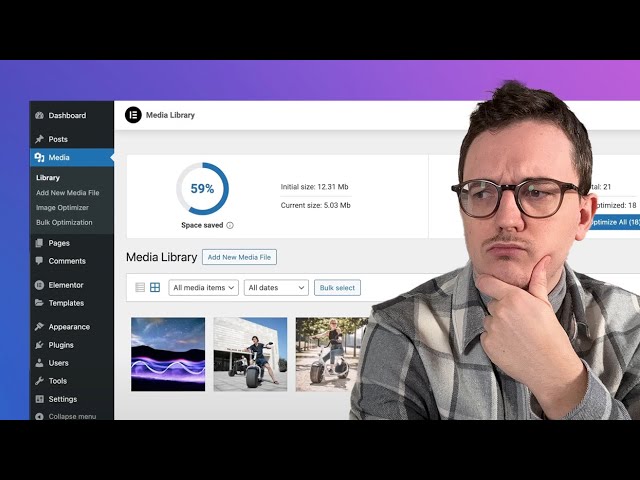
Monitoring And Testing Site Speed
Ensuring your website loads quickly is crucial. A fast-loading site improves user experience and SEO rankings. Monitoring and testing site speed helps identify issues. This ensures your Elementor image optimizer works effectively.
Using Speed Testing Tools
Several tools can test your website speed. These tools provide insights into performance.
- Google PageSpeed Insights: This tool analyzes your site and provides suggestions.
- GTmetrix: GTmetrix offers detailed reports on page load speed.
- Pingdom: Pingdom gives a comprehensive speed test and performance grade.
Interpreting Results
Understanding the test results is key. Look for specific metrics.
| Metric | Description |
|---|---|
| Page Load Time | The time it takes for a page to fully load. |
| First Contentful Paint (FCP) | Time it takes to display the first text or image. |
| Largest Contentful Paint (LCP) | Time it takes to load the largest visible element. |
| Time to Interactive (TTI) | The time it takes for the page to become interactive. |
Focus on reducing these times. Optimizing images is a significant step.
Credit: elementor.com
Case Studies And Real-world Examples
Understanding the impact of Elementor Image Optimizer is crucial. Real-world examples and case studies provide valuable insights. These stories showcase the effectiveness of using the ideal image size.
Success Stories
Several businesses have benefited from optimizing their images. Here are some success stories:
| Business | Results |
|---|---|
| Fashion E-commerce | Improved page speed by 45% |
| Travel Blog | Increased user engagement by 30% |
| Local Restaurant | Boosted online orders by 20% |
The Fashion E-commerce site noticed faster loading times. The Travel Blog saw more readers staying longer. The Local Restaurant enjoyed more orders through their website.
Lessons Learned
These success stories also highlight key lessons. Here are some important takeaways:
- Use the right image format: JPEG for photos, PNG for graphics.
- Optimize image dimensions: Resize images to fit their display area.
- Compress images: Reduce file size without losing quality.
- Leverage lazy loading: Load images as users scroll down.
- Test regularly: Monitor and adjust for optimal performance.
By following these practices, businesses can achieve better results. The right image size and optimization techniques make a significant difference.
Conclusion
Optimizing images for Elementor boosts website speed and user experience. Use ideal image sizes for faster load times. This practice enhances SEO and keeps visitors engaged. Implementing these tips ensures your site performs at its best. Happy optimizing!
You can contact us if you need any help